09 May 2020
虚拟机和Java虚拟机
所谓虚拟机就是一款软件,用来执行一系类虚拟的计算机指令。大体上,虚拟机可以分为系统虚拟机和程序虚拟机,VMware就属于系统虚拟机,他们完全是对物理计算机的仿真,提供了一个可运行完整操作系统的软件平台(比如:Windows上装WMware,WMware里面装Linux)。程序虚拟机就是专门为执行单个程序而设计的,java虚拟机(Java Virtual Machine)用来执行Java字节码指令的。我们写的.java文件先被编译成.class文件,java虚拟机加载这个.class文件并且执行文件中的字节码,这样我们写的java代码就运行起来了。
jvm架构
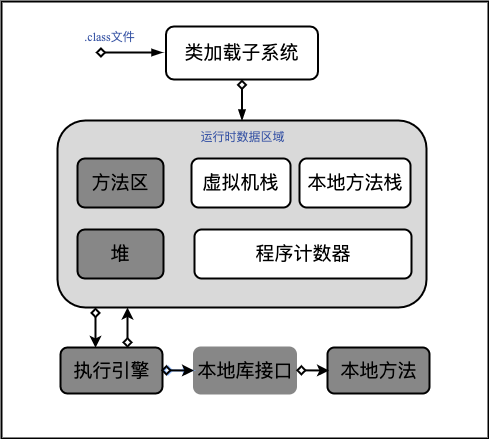
jvm架构主要分为三个子系统:类加载子系统、运行时数据区域和执行引擎。简单介绍。
类加载子系统(ClassLoader Subsystem):实现java类的动态加载功能,当java程序在运行时第一次引用某个类,类加载系统就加载、连接并且初始化这个类对应的class文件。而不是在编译期就做这些事情。运行时数据区(Runtime Data Area):java字节码将分配到这个区域,具体介绍如下。执行引擎(Execution Engine):分配至运行时数据区的的字节码将会被执行引擎执行,执行引擎读这些字节码并且一段一段地执行。
运行时数据区域
java虚拟机管理的内存是系统内存的一部分。java虚拟机在执行java程序时会把它管理的内存区域划分成:程序计数器、java虚拟机栈、本地方法栈、java堆和方法区五个部分。运行时数据区的内部结构如上图所示,其中虚拟机栈、本地方法栈、程序计数器的是线程隔离的,每个线程中的这三个区域的随着线程的启动和结束而建立和销毁。方法区和堆是线程共享的。
程序计数器
程序计数器(Program Counter Register)是每个线程的私有空间,java虚拟机会为每个java线程创建一个程序计数器。在任意时刻,java线程总是在执行一个方法,这个正在被执行的方法被称为当前方法,如果当前方法不是本地方法,则程序计数器就会指向当前正在被执行的指令,如果当前方法是本地方法,程序计数器的值为空。程序计数器是程序控制流的指示器,分支、循环、跳转、异常处理、线程回复等基础功能都要依赖这个指示器来完成。
java虚拟机栈
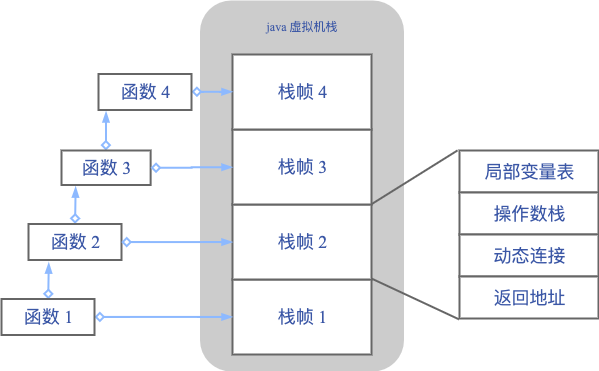
java虚拟机栈(Java Virtual Machine Stack)也是线程私有的,类的方法被执行的时候,java虚拟机就会为每个方法创建一个栈帧(Stack Frame)用于存储该方法的局部变量表、操作数栈、动态连接、方法出口等信息。每个一个方法被调用直到执行完毕的过程,就对应着一个栈帧在虚拟机栈中从出栈到入栈的过程。栈帧和方法是一对一的关系,虚拟机栈和方法是一堆多的关系。
每一次函数调用,都会有个对应的栈帧被压入java虚拟机栈,调用结束后这个栈帧被弹出java虚拟机栈。假如函数1中有子函数2……以此类推,对应的栈帧入栈如上图所示。由这些可以得知频繁的出栈入栈会增大时间开销,先看一段代码:
for(int i=0; i<objects.length(); i++){
    ..........
}
objects.length()执行一次应该花费不了多少时间,但是当objects中元素个数很多时,频繁的入栈出栈也会增大时间开销,显然这种写法是不可取的。
可以改成下面的代码:
int length = objects.length()
for(int i=0; i<length; i++){
    ..........
}
这么写无论objects中有多少个元素,都只执行一次入栈出栈操作。不过我已经很少使用for循环了,lambda表达式真的很好用。
栈帧的局部变量表中保存着局部变量(基本数据类型和和对象引用)。(有个问题,类的成员变量的对象引用存放在哪个区域?)
java虚拟机栈中会抛出两种异常:如果线程请求深度大于虚拟机所允许的深度,将抛出StackOverflowError异常,比如:递归调用忘了设置边界条件;局部变量保存会占用存储空间,当局部变量要占用的内存超过java虚拟机栈可分配的内存时,会抛出OutOfMemoryError异常。
本地方法栈
本地方法栈(Native Method Stacks)与虚拟机栈的作用是相似的,不同的是:虚拟机栈的是为执行用户编写的java方法服务的,本地方法栈是为执行本地方法服务的。那什么事本地方法呢?本地方法(Native Method)在java源程序中以关键字”Native“声明,不提供函数体,其实现使用C/C++在另外的文件中编写,编写的规则遵循java本地接口规范。简而言之:本地方法就是java中声明的可使用C/C++实现的方法。
java堆
java 堆(Java Heap)是java虚拟机管理的内存中最大的一块,而且这块区域被所有的线程共享。java中的对象实例几乎都在这里分配(如果是栈上分配,对象实例会分配在栈帧中)。java对也是垃圾收集器主要发挥作用的区域(至于分配策略和垃圾回收机制,后面再写吧),同样当java对中没有内存空间完成实力分配时也会抛出OutOfMemoryError异常。
方法区
方法区(Method Area)也是各个线程共享的内存区域,它用于存储已经被虚拟机加载的类型信息、常量、静态变量、即时编译器编译后的代码缓存等数据。
运行时常量池(Runtime Constant Pool)是方法区的一部分。java文件编译后生成的class文件中有一项信息是常量池表(Runtime Pool Table),用于存放编译期生成的各种字面量和符号应用,这部分内容在类加载后存放到方法区的运行时常量池中。方法区如果无法满足新的内存分配需求是也会抛出OutOfMemoryError异常。
23 Apr 2020
也是在工作中遇到小问题,查到原因后依旧是没有规避到空值。
简化的场景
假设我们有一张学生表:
create table students(
	name varchar(255) not null,
    sex varchar(255) not noll,
    score int(11);
)
这张表也很简单,就姓名、性别、成绩三个字段。
也是很简单的一个场景,但能说明问题。
需求:将一些学生的成绩减去10分。
<update id="updateStudentScore">
    update student
    set core = score - 10
    where name in
    <foreach collection="names="item" separator="," open="(" close=")">
      #{item}
    </foreach>
</update>
这种写法正常情况时完全ok的,但是当names是个空列表时,就会报异常。
使用 choose when otherwise
<update id="updateStudentScore">
    update student
    set core = score - 10
    where name in
    <choose>
      <when test="names == null || names.isEmpty()">
        where 1=0
      </when>
      <otherwise>
        where name in
        <foreach collection="names" index="index" item="item" separator="," open="(" close=")">
          #{item}
        </foreach>
      </otherwise>
    </choose>
</update>
这种动态SQL就可以规避掉空列表异常的现象,类似于java的 if..else if..else。当然也可以在外围判断类表是否为空,如果是,则不执行update score操作,这也是可以的,当然,最终是要根据尝尽确定解决办法。
15 Apr 2020
不需要配置文件场景下的属性注入
@Value注解可以在不需要配置文件的情况下注入属性,经常会看到两种写法 ${}和 #{} :
${properties名称}的表示获取properties的值,注入配置文件中的属性的值。
#{表达式} 括号里面的表达式必须是SpEL表达式的格式。通过 #{表达式} 方式可以在不需要使用配置文件的情况下,动态的将外部值注入到bean中。
@Component
@ToString
public class InjectWithoutConfigurationFile {

  // 注入普通字符串
  @Value("diego")
  private String name;

  // 注入表达式
  @Value("#{T(java.lang.Math).random()}")
  private double random;

  // 注入系统属性
  @Value("#{systemProperties['os.name']}")
  private String defaultLocale;

  // 注入其他bean的属性值
  @Value("#{rectangle.length}")
  private int rectangleLength;

  // 注入url
  @Value("http://www.baidu.com")
  private Resource baiduUrls;

}
测试结果:
InjectWithoutConfigurationFile(name=diego, random=0.20947710881441184, defaultLocale=Mac OS X, rectangleLength=20, baiduUrls=URL [http://www.baidu.com])
配置文件中的属性注入
在Spring Boot项目中,先在全局配置文件中配置好属性值,在项目启动时这些属性自动注入到对应bean对应属性中。
全局配置文件:
- application.properties
- application.yaml
这两个都是全局配置文件,但properties的优先级高于yaml,当两个文件中对统一属性配置不同的值时,以properties文件中的为准,两个文件中的不同配置互补。
实现配置文件中的属性自动注入有一下几种方式:
@Value的${}方式
value.from.file=Value got from the file
priority=Properties file
listOfValues=A,B,C
@ToString
@Component
public class Properties {

  @Value("${value.from.file}")
  private String valueFromFile;

  @Value("${priority}")
  private String prioritySystemProperty;

  @Value("${listOfValues}")
  private String[] valuesArray; // 注入数组
}
在测试中如果将listOfValues卸载yaml配置文件中,形如下面的样子,再用@Value(“${listOfValues}”) 注入的时候会报错。
listOfValues:
	- A
	- B
	- C
在开发过程中,如果需要将配置文件中的单个属性注入bean中,采用@Value是最简单的方式。当然@Value注解也可以将object注入,但总觉得操作有限。
@ConfigurationProperties
当配置文件中的object很复杂时,选用@ConfigurationProperties将object注入会很方便。@ConfigurationProperties注解的使用也有好几种方式,这里主要介绍两种:
-
Spring Boot 2中,可以使用@ConfigurationProperties和@ConfigurationPropertiesScan两个注解实现配置注入。
 mail:
   hostname: host@mail.com
   port: 9000
   from: mailer@mail.com
   defaultRecipients:
     - admin@mail.com
     - owner@mail.com
   additionalHeaders:
     redelivery: true
     secure: true
     p3: value
 @SpringBootApplication
 @ConfigurationPropertiesScan("com.yang.config")
 public class ConfigApplication {

   public static void main(String[] args) {
     SpringApplication.run(ConfigApplication.class, args);
   }
 }
 @ConfigurationProperties(prefix = "mail")
 @ToString
 @Setter
 public class ConfigProperties {

   private String hostName;
   private int port;
   private String from;

   private List<String> defaultRecipients;
   private Map<String, String> additionalHeaders;

 }
@ConfigurationPropertiesScan(“com.yang.config”)表示扫描com.yang.config包下的@ConfigurationProperties注解,@ConfigurationProperties(prefix = “mail”)表示将配置文件中前缀为mail的属性与ConfigProperties中的对应的成员变量映射起来。必须为要映射的成员变量创建setter方法,才能将配置文件中的属性值映射成功。
测试结果:
ConfigProperties(hostName=host@mail.com, port=9000, from=mailer@mail.com, defaultRecipients=[admin@mail.com, owner@mail.com], additionalHeaders={redelivery=true, secure=true, p3=value})
-
使用@ConfigurationProperties和@Component注解
 @Component
 @ConfigurationProperties(prefix = "mail")
 @ToString
 @Setter
 public class ConfigProperties {

   private String hostName;
   private int port;
   private String from;

   private List<String> defaultRecipients;
   private Map<String, String> additionalHeaders;

 }
当然还有其他的的注解也能实现复杂的object的注入,我觉得上面这两种使用简单,理解也很容易。
@PropertySource
有时候我们可能会自定义配置文件,专门用来保存某个类的配置,这时需要使用@PropertySource注解先将自定义配置文件加载进来。
# customConfigProperties.properties配置文件

#Simple properties
custom.hostname=host@mail.com
custom.port=9000
custom.from=mailer@mail.com

#List properties
custom.defaultRecipients[0]=admin@mail.com
custom.defaultRecipients[1]=owner@mail.com

#Map Properties
custom.additionalHeaders.redelivery=true
custom.additionalHeaders.secure=true
custom.additionalHeaders.p3=value
@PropertySource("classpath:/customConfigProperties.properties")
@ConfigurationProperties(prefix = "custom")
@Component
@ToString
@Setter
public class CustomConfigProperties {

  private String hostName;
  private int port;
  private String from;

  private List<String> defaultRecipients;
  private Map<String, String> additionalHeaders;
}
可以看出@PropertySource注解将自定义的customConfigProperties.properties配置文件加载进来。之后用@ConfigurationProperties和@Component组合的方式将配置文件的中的object注入。
注:@PropertySource注解不支持加载自定义yaml格式的配置文件。
测试结果:
CustomConfigProperties(hostName=host@mail.com, port=9000, from=mailer@mail.com, defaultRecipients=[admin@mail.com, owner@mail.com], additionalHeaders={redelivery=true, secure=true, p3=value})
实现EnvironmentPostProcessor
EnvironmentPostProcessor接口允许用户在Spring Boot应用启动之前操作 Environment,官方参考资料。
这个链接介绍如何载入和转换自定义的属性到 Environment中,并且最后再访问自定义的属性。
可以用这个接口加载自定义yaml配置文件。
创建自定义配置文件
创建person.yml文件,内容很简单。
personconfig:
  name: lee
  age: 20
实现EnvironmentPostProcessor接口,加载自定义的配置文件。
这段代码来自官方参考文档。
public class PersonConfigProcessor  implements EnvironmentPostProcessor {

  private final YamlPropertySourceLoader loader = new YamlPropertySourceLoader();

  @Override
  public void postProcessEnvironment(ConfigurableEnvironment environment,
                                     SpringApplication application) {
    // 加载自定义的配置文件
    Resource path = new ClassPathResource("persons.yml");
    PropertySource<?> propertySource = loadYaml(path);
    environment.getPropertySources().addLast(propertySource);

  }

  private PropertySource<?> loadYaml(Resource path) {
    if (!path.exists()) {
      throw new IllegalArgumentException("Resource " + path + " does not exist");
    }
    try {
      return this.loader.load("custom-person", path).get(0);
    }
    catch (IOException ex) {
      throw new IllegalStateException("Failed to load yaml configuration from " + path, ex);
    }
  }
}
将接口的实现类注册
PersonConfigProcessor 必须注册到 META-INF/spring.factories 文件中,目的是让Spring Boot在启动时能扫描到这个类,之后才能加载 。
org.springframework.boot.env.EnvironmentPostProcessor=com.yang.config.PersonConfigProcessor
构建要绑定的对象
配置文件的目的就是为将其定义的属性注入到java object中,所以还需要构建一个类用来“接”配置文件定义的内容。
@Component
@ConfigurationProperties(prefix = "personconfig")
@ToString
@Setter
public class PersonConfig {
  private String name;
  private int age;
}
这里的@Setter 不能省略,这种方式也是:先调用无参构造函数构造对象,再调用属性的set方法初始化。使用PersonConfig时,直接装配就可以了。
@Autowired
private PersonConfig personConfig;
测试结果:
PersonConfig(name=lee, age=20)
小结:
- 如果不需要配置文件,直接注入,使用
@Value注解。
- 用到了配置文件,但注入的都是单个属性值,将要注入的属性写在在
application.properties/application.yml 中,用@Value ${}方式注入。
- 用到了配置文件,但注入的是个object,将要注入的object写在
application.properties/application.yml 中,用 @ConfigurationProperties 注入。
- 自定义properties配置文件,选用
@PropertySource 注入。
- 自定义yaml配置文件,选用“实现EnvironmentPostProcessor”的方式注入。
其实,4和5的注入方式都是先将配置文件加载进来,再用@ConfigurationProperties绑定类。只是不同类型的文件,加载的方式不一样。
github
14 Apr 2020
Spring Boot内部对大量的第三方库或者Spring内部库进行了默认的配置,这些配置是否生效,取决于我们是否引入了对应库所需的依赖,而且通过全局配置文件可以对默认配置进行修改。自动配置的目的就是让第三方jar包里面的类很方便的添加到 IOC容器中去,大大简化了项目的配置过程。
Spring Boot项目是怎么找到这些可以自动配置的第三方jar包中的类的?
@SpringBootApplication
public class AutoconfigApplication {

  public static void main(String[] args) {
    SpringApplication.run(AutoconfigApplication.class, args);
  }

}
这是Spring Boot项目的启动入口,也叫主配置类。@SpringBootApplication 是个组合注解,内部如下:
@Target(ElementType.TYPE)
@Retention(RetentionPolicy.RUNTIME)
@Documented
@Inherited
@SpringBootConfiguration
@EnableAutoConfiguration
@ComponentScan(excludeFilters = { @Filter(type = FilterType.CUSTOM, classes = TypeExcludeFilter.class),
		@Filter(type = FilterType.CUSTOM, classes = AutoConfigurationExcludeFilter.class) })
public @interface SpringBootApplication {
里面有一大堆注解,主要的就三个:
@SpringBootConfiguration: 其实里面是个@Configuration注解,表明Spring Boot项目的入口类也是个配置类。@ComponentScan:被这个注解的类所在包以及子包下的所有”组件“都会被扫描,并将其bean添加到spring 容器里面。@EnableAutoConfiguration:字面意思:启动自动配置,很显然用该是自动配置的入口了。进入~~
Target(ElementType.TYPE)
@Retention(RetentionPolicy.RUNTIME)
@Documented
@Inherited
@AutoConfigurationPackage
@Import(AutoConfigurationImportSelector.class)
public @interface EnableAutoConfiguration {
@AutoConfigurationPackage:它的功能简单说就是将应用的root package给注册到Spring容器中,供后续使用。@Import(AutoConfigurationImportSelector.class):字面意思:导入自动配置选择器。
看了好多博客,里面描述的都是@Import注解导入 AutoConfigurationImportSelector 后,调用了它里面的selectImports() 方法等等。我在这个方法里面打断点,之后启动debug,程序并没有在这个方法中停下来而是正常启动,所以应该是没有调用这个方法。我用的Spring Boot 2.2.6,但那么多人这么写,总不是空穴来风吧,这个之后在仔细研究吧。
但能确定的是自动配置调用了 AutoConfigurationImportSelector 类中的 getAutoConfigurationEntry 方法。
protected AutoConfigurationEntry getAutoConfigurationEntry(
	AutoConfigurationMetadata autoConfigurationMetadata,
	AnnotationMetadata annotationMetadata) {
	if (!isEnabled(annotationMetadata)) {
		return EMPTY_ENTRY;
	}
	AnnotationAttributes attributes = getAttributes(annotationMetadata);
    // 获取所有候选的配置。
	List<String> configurations = getCandidateConfigurations(annotationMetadata, attributes);
	// 将List放入Set再放入List,去掉重复的类名。
	configurations = removeDuplicates(configurations);
    // 获取不需要自动配置的类名。
	Set<String> exclusions = getExclusions(annotationMetadata, attributes);
    // 检查需要移除的配置是否在候选列表中,如果有不存在的,会抛出异常。
	checkExcludedClasses(configurations, exclusions);
    // 从候选配置列表中删除不需要的配置。
	configurations.removeAll(exclusions);
    // 过滤掉不需要的配置。
	configurations = filter(configurations, autoConfigurationMetadata);
    // 将自动配置导入事件通知监听器。
    fireAutoConfigurationImportEvents(configurations, exclusions);
	return new AutoConfigurationEntry(configurations, exclusions);
}
获取类路径下所有jar包中的需要自动配置的类是通过 getCandidateConfigurations() 方法实现的。具体内容:
	protected List<String> getCandidateConfigurations(AnnotationMetadata metadata, AnnotationAttributes attributes) {
	List<String> configurations = SpringFactoriesLoader.loadFactoryNames(getSpringFactoriesLoaderFactoryClass(),getBeanClassLoader());
	Assert.notEmpty(configurations, "No auto configuration classes found in META-INF/spring.factories. If you "+ "are using a custom packaging, make sure that file is correct.");
	return configurations;
	}
在这个方法中调用了 SpringFactoriesLoader.loadFactoryNames 方法去加载配置。最后以 List<String> 的形式将加载到的配置返回。
SpringFactoriesLoader.loadFactoryNames方法:里面也很简单,如下所示,里面定义了factoryTypeName 并且调用了 loadSpringFactories(classLoader) 方法后将结果返回,根据 getOrDefault 方法,我们应该能猜出loadSpringFactories(classLoader) 的返回值是个map类型的,再结果是以 List<String> 形式返回,就能确定loadSpringFactories(classLoader) 的返回值形式是:Map<String, List<String>>。(这段有点瞎扯,我分析这个干毛线啊,瞅一眼不不就行了吗)
public static List<String> loadFactoryNames(Class<?> factoryType, @Nullable ClassLoader classLoader) {
	String factoryTypeName = factoryType.getName();
	return loadSpringFactories(classLoader).getOrDefault(factoryTypeName,Collections.emptyList());
	}
其实在Spring Boot项目中,可以自动配置的类的类名都存放在jar包中的META-INF/spring.factories 文件中,loadSpringFactories方法的功能就是从META-INF/spring.factories 文件中将所有可以自动配置的类的类名给读出来,并存放到Map<String, List<String>> 类型的对象中,最后返回,就干了这么一件事情。getOrDefault(factoryTypeName, Collections.emptyList()) 的作用就是,从全部的可以自动配置的类中,找出我想要的那一组。factoryTypeName 的值就是spring.factories文件中等号左边的值,比如:ApplicationContextInitializer、ApplicationListener等等。
这个是spring-boot-autoconfigure-2.2.6.RELEASE.jar下的spring.factories文件内容:(当然别的jar包中也有spring.factories文件)。
# Initializers
org.springframework.context.ApplicationContextInitializer=\
org.springframework.boot.autoconfigure.SharedMetadataReaderFactoryContextInitializer,\
org.springframework.boot.autoconfigure.logging.ConditionEvaluationReportLoggingListener

# Application Listeners
org.springframework.context.ApplicationListener=\
org.springframework.boot.autoconfigure.BackgroundPreinitializer

# Auto Configuration Import Listeners
org.springframework.boot.autoconfigure.AutoConfigurationImportListener=\
org.springframework.boot.autoconfigure.condition.ConditionEvaluationReportAutoConfigurationImportListener

# Auto Configuration Import Filters
org.springframework.boot.autoconfigure.AutoConfigurationImportFilter=\
org.springframework.boot.autoconfigure.condition.OnBeanCondition,\
org.springframework.boot.autoconfigure.condition.OnClassCondition,\
org.springframework.boot.autoconfigure.condition.OnWebApplicationCondition

.........
loadSpringFactories方法:
private static Map<String, List<String>> loadSpringFactories(@Nullable ClassLoader classLoader) {
	// 先从缓存中加载这些可以自动配置的类名,如果能加载到就直接返回,如果不能再从文件中加载。
	MultiValueMap<String, String> result = cache.get(classLoader);
	if (result != null) {
		return result;
	}

	try {
        //拿到类路径下的所有jar包中的spring.factories的路径,并存放到urls变量中。
        // FACTORIES_RESOURCE_LOCATION = META-INF/spring.factories
		Enumeration<URL> urls = (classLoader != null ?
       classLoader.getResources(FACTORIES_RESOURCE_LOCATION) 	:ClassLoader.getSystemResources(FACTORIES_RESOURCE_LOCATION));
		result = new LinkedMultiValueMap<>();
		while (urls.hasMoreElements()) {
        // 拿出一个spring.factories的路径,扫描里面可以自动配置的类的类名。
		URL url = urls.nextElement();
		UrlResource resource = new UrlResource(url);
        /**
        * 将每一个spring.factories中的要自动跑配置的类名以key-value的形式封装成properties对象。
        * key就是等号左边的,value就是等号右边。
        */
		Properties properties = PropertiesLoaderUtils.loadProperties(resource);
		for (Map.Entry<?, ?> entry : properties.entrySet()) {
			String factoryTypeName = ((String) entry.getKey()).trim();
			for (String factoryImplementationName : StringUtils.commaDelimitedListToStringArray((String) entry.getValue())) {
            // 将可以自动配置的类的类名存放到result 中。
				result.add(factoryTypeName, factoryImplementationName.trim());
				}
			}
		}
        // 将可以自动配置的类的类名加载到缓存中。
		cache.put(classLoader, result);
		return result;
		}
		catch (IOException ex) {
			throw new IllegalArgumentException("Unable to load factories from location [" +
					FACTORIES_RESOURCE_LOCATION + "]", ex);
		}
	}
在Spring Boot项目启动时可以自动配置的类就这样被全部扫描到了,接下来就是按照类的路径进行加载,创建bean并将其加入Spring容器中。
类找到了,自动配置是怎么实现的呢?
再来看下spring-boot-autoconfigure-2.2.6.RELEASE.jar下的spring.factories文件中 EnableAutoConfiguration 部分。下图中截取了其中一部分。
# Auto Configure
org.springframework.boot.autoconfigure.EnableAutoConfiguration=\
org.springframework.boot.autoconfigure.admin.SpringApplicationAdminJmxAutoConfiguration,\
org.springframework.boot.autoconfigure.aop.AopAutoConfiguration,\
org.springframework.boot.autoconfigure.amqp.RabbitAutoConfiguration,\
org.springframework.boot.autoconfigure.batch.BatchAutoConfiguration,\
org.springframework.boot.autoconfigure.cache.CacheAutoConfiguration,\
org.springframework.boot.autoconfigure.cassandra.CassandraAutoConfiguration,\
org.springframework.boot.autoconfigure.cloud.CloudServiceConnectorsAutoConfiguration,\
org.springframework.boot.autoconfigure.context.ConfigurationPropertiesAutoConfiguration,\
org.springframework.boot.autoconfigure.context.MessageSourceAutoConfiguration,\
org.springframework.boot.autoconfigure.context.PropertyPlaceholderAutoConfiguration,\
org.springframework.boot.autoconfigure.couchbase.CouchbaseAutoConfiguration,\

.........
org.springframework.boot.autoconfigure.web.servlet.ServletWebServerFactoryAutoConfiguration,
.........
可以看到,@EnableAutoConfiguration注解的自动配置类都是以 XXXConfiguration 结尾的,
我们以 ServletWebServerFactoryAutoConfiguration 为例看看里面到底是什么。
@Configuration(proxyBeanMethods = false)
@AutoConfigureOrder(Ordered.HIGHEST_PRECEDENCE)
@ConditionalOnClass(ServletRequest.class)
@ConditionalOnWebApplication(type = Type.SERVLET)
@EnableConfigurationProperties(ServerProperties.class)
@Import({ ServletWebServerFactoryAutoConfiguration.BeanPostProcessorsRegistrar.class,
		ServletWebServerFactoryConfiguration.EmbeddedTomcat.class,
		ServletWebServerFactoryConfiguration.EmbeddedJetty.class,
		ServletWebServerFactoryConfiguration.EmbeddedUndertow.class })
public class ServletWebServerFactoryAutoConfiguration {
@Configuration:表明ServletWebServerFactoryAutoConfiguration 是个javaConfig类型的配置类,配置类的作用是给Spring 容器中添加bean的。@AutoConfigureOrder(Ordered.HIGHEST_PRECEDENCE): 表示这个类的配置顺序是高优先级。@ConditionalOnClass(ServletRequest.class):表示当ServletRequest.class在类路径下存在时,这个配置类才生效。-
@ConditionalOnWebApplication(type = Type.SERVLET):表示当前的Spring Boot应用程序是web应用程序的时候,这个配置类才生效。
-
@EnableConfigurationProperties(ServerProperties.class): 这个注解比较重要了,自动配置就是从这开始的。EnableConfigurationProperties 字面意思:启动配置属性,它的实际作用是将ServerProperties.class生成bean,并添加到Spring 容器中。
@Import() :这个注解就是导入一些其他类的bean。
在这些注解中,3和4是条件注解,而且只有当这两个条件同事满足时,ServletWebServerFactoryAutoConfiguration 配置类才生效。
那接下来还有个问题:@EnableConfigurationProperties将ServletRequest.class的bean添加到了Spring 容器中,那这个bean的属性的值是什么呢?
先来看下 ServerProperties.class 类,也只截取了一小部分。
@ConfigurationProperties(prefix = "server", ignoreUnknownFields = true)
public class ServerProperties {

	/**
	 * Server HTTP port.
	 */
	private Integer port;

	/**
	 * Network address to which the server should bind.
	 */
	private InetAddress address;
@ConfigurationProperties注解的功能是将全局配置文件中的属性和ServerProperties类中的属性绑定起来,说白了就是用配置文件中的属性更新ServerProperties类中对应的属性的默认值。prefix = "server" 指的是在全局配置中属性的前缀是什么。
在全局配置文件 application.properties 中,我们常会看到一个配置:
这个配置是用来修改服务的HTTP端口的,当 ServerProperties 生成对应的bean时,就会拿 server.port 的值更新 ServerProperties 的 port 属性的默认值。
ServerProperties 每个属性都有默认的值,当全局配置文件中没有配置对应属性时,ServerProperties 就会使用默认值来出生成bean。
总结
ServletWebServerFactoryAutoConfiguration的自动配置过程总结一下:
目的:
自动配置ServletWebServerFactoryAutoConfiguration的目的是在Spring Boot项目启动时,将server相关的类生成对应的bean添加到Spring 容器中。
执行过程:
ServletWebServerFactoryAutoConfiguration类的路径在在spring.factories中被扫描到,在将添加server相关bean时,先是确定ServerProperties 中属性的值,通过@ConfigurationProperties注解从全局配置值中读取,如果能读到,则就用全局配置的中的值,如果读不到,就用默认值。@EnableConfigurationProperties注解将确定值的ServerProperties类生成bean并且添加到Spring 容器中去。接着是ServletWebServerFactoryAutoConfiguration类中的方法使用ServerProperties bean 去生成其他的 server bean,并添加到Spring 容器。这样跟server相关的组件在项目启动时就被加入到了spring容器中。
EnableAutoConfiguration下的其他的XXXConfiguration的自动配置也是这样的流程。
13 Mar 2020
工作中遇到个场景需要批量更新表中的记录。当时很明确了,在业务代码里使用循环更新这种方式肯定不可取的,频繁连接数据库是个糟糕的设计。所以就想到批量更新,只连接一次数据库,逐条更新的操作放到数据库里面去执行。即便已经意识到了多次连接会造成效率下降,但还需要对场景再考虑下,选择适合的逻辑实现方式。
使用场景
在需要批量更新时,就查询条件相对于更新的对象而言,会有一对多和多个一对一两种的场景。
场景1:老师要给全班所有学生的数学成绩加10分,用老师Id作为查询条件就可以筛选出全班所有的同学,“每个同学的数学成绩加10分”表示所有查询出来的记录要更新的值是一样的。
场景2:某次考试结束了,老师要更新每个同学的数学成绩,这种场景下老师Id就不可能在作为查询条件了,送入的参数应该是个Student列表,每个Student对象中包含学生Id和他的数学成绩,SQL通过for循环的方式更新每个同学的成绩。
在动手之前想清楚当下问题复合哪种场景,那基本的架子就算是有。接下来就是细节上的事情了,该送入什么参数,具体怎么更新….等等。等这些都确认好,实现已经不难了。
一对多
这种批量更新跟简单,而且特征也很明显:(1)确定的查询条件(可以是and组合的)能够筛选出所有要更新的记录;(2)这些记录要更新的值或者关键值是一样的。就如同场景1,代码应该如下:
<update id="updateMath">
  update student
  set math_score = math_score + #{addMathScore}
  where teacher_id = #{teacherId}
</update>
addMathScore 和 teacherId 由 mapper.xml 中的接口送进来就可以了。更新数学成绩的场景很简单,但我觉得还是需要再推敲下的。采用“多个一对一”的方式给每个学生的数学成绩加10分也是可行的,而且脑子里首先想到的应该也是这种方式。但要真这么干反而麻烦了(先不说两种执行方式效率的快慢),首先得构建个类(student.class),再生成多个 student object ,这些object 中的 addMathScore 是一样的,studentId 各不相同,这就有种很“浪费”的感觉。也许会想到:可以用单独的变量保存 addMathScore ,再定义一个 List<String> 变量存储所有的 studentId ,这样就简单好多了。但等真的动手的时候又会发现,所有的学生Id又得先从数据库中搂出来。其实在这种场景下,从 class 到 list object生成远没有两个变量来的简单。
在工作中会遇到批量修改名字或者修改某些字段的需求,开发的之前应该主动想一下当前问题否适合这一场景,因为它简洁明了却“藏”在后面。
多个一对一
与上面的对应,这种场景的特征是:(1)唯一确定的where条件只能选出一条记录;(2)而且这些记录更新的值每个都是不一样的。这样只能将 筛选条件 和 要更新的值封装在对象中,以list object的形式送到MySQL中,最后通过循环的形式更新每条记录。
方式一
<update id="updateBatch"  parameterType="java.util.List">
    <foreach collection="list" item="item" index="index" open="" close="" separator=";">
        update tableName
        <set>
            name=#{item.name},
            name2=#{item.name2}
        </set>
        where id = #{item.id}
    </foreach>
</update>
先贴上代码,这种更新简洁明了,使用for循环一条记录update一次,但效率不是很高。注意的是:MySQL 默认不支持多条 SQL 语句执行,所以需要在 MySQL 的 URL 后面添加 &allowMultiQueries=true 才能保证上述方式运行成功。还有一点要注意的是,H2 不支持这样的操作,公司项目里本地测境用的是 H2,线上用的是 MySQL,着实被这块小坑了一把。
方式二
<update id="list"  parameterType="java.util.List">
  update tableName
  <trim prefix="set" suffixOverrides=",">
    <trim prefix="owner_id =case" suffix="end,">
      <foreach collection="list" item="item" index="index">
        when full_id=#{item.originalFullId} then #{item.newOwnerId}
      </foreach>
    </trim>
    <trim prefix="full_id =case" suffix="end,">
      <foreach collection="list" item="item" index="index">
        when full_id=#{item.originalFullId} then #{item.newFullId}
      </foreach>
    </trim>
  </trim>
  where full_id in
  <foreach collection="list" index="index" item="item" separator="," open="(" close=")">
    #{item.originalFullId,jdbcType=VARCHAR}
  </foreach>
</update>
这种方式使用的SQL的 case-when-then 语法实现了批量更新,H2和MySQL都可以执行。
SQL语法原型:
 UPDATE course
    SET name = CASE id
        WHEN 1 THEN 'name1'
        WHEN 2 THEN 'name2'
        WHEN 3 THEN 'name3'
    END,
    title = CASE id
        WHEN 1 THEN 'New Title 1'
        WHEN 2 THEN 'New Title 2'
        WHEN 3 THEN 'New Title 3'
    END
WHERE id IN (1,2,3)
这条sql的意思是,如果id为1,则name的值为name1,title的值为New Title1;依此类推,将所有的cast都给摆出来,对号入座。
mybatis拼出来的结果:
update mydata_table
	set status =
case
	when id = #{item.id} then #{item.status} end,
	...
	when id = id = #{item.id} then #{item.status} end
	where id in (...);
trim标签:
<trim prefix="" suffix="" suffixOverrides="" prefixOverrides=""></trim>
prefix: 如果 trim 中有内容,则在 SQL 语句中加上 prefix 指定的字符串前缀。
prefixOverrides: 如果 trim 中有内容,去除 prefixOverrides 指定的多余的前缀内容。
suffix: 如果 trim 中有内容,则在 SQL 语句中加上 suffix 指定的字符串后缀。
suffixOverrides: 如果 trim 中有内容,去除 suffixOverrides 指定的多余的后缀内容。
这里有个要注意的地方:
方式二更新了两个字段: owner_id 和 full_id ,当数据库是 MySQL 时,这两个字段中谁是主键,则这个字段要放在最后更新,不然会更新失败。但如果数据库是 H2 ,则没有这个顺序要求。有点疑惑~~~
方式三
上述两种方法都是在拼SQL,他们被一些开发者吐槽是奇技淫巧。至于到底什么事奇技淫巧好像没有定义啊,我觉得还是得从场景、效率、可读性来评价当前实现方式的优劣。
mybatis对批量更新提供了正确打开方式:ExecutorType.BATCH。
这种方式不适合XML格式的mybatis操作。
总结
“磨刀不误砍柴工”,敲代码已经是最后一道工序了,但在动手敲之前需要先想清楚实现功能的代码架子是什么样子,将有疑惑的细节确认清楚,这个很重要。这些都想的差不多了,敲代码就会有底气,效率也会高起来。